Tempering control of forging processes by integration of cavities
Process optimization in hot bulk-metal forging by introduction of an intelligent temperature control for the forging dies.
In hot bulk-metal forming processes, a regulated temperature control for tools (dies) permits an effective prevention of defects as well as a reduction in process interruptions by means of temperature stabilization (Figure 1). A reduction of thermally induced wear leads to a favorable decrease in the tool costs. Such a die temperature control is of particular importance for processes like precision forging in which geometrical integrity of produced parts is the main concern.


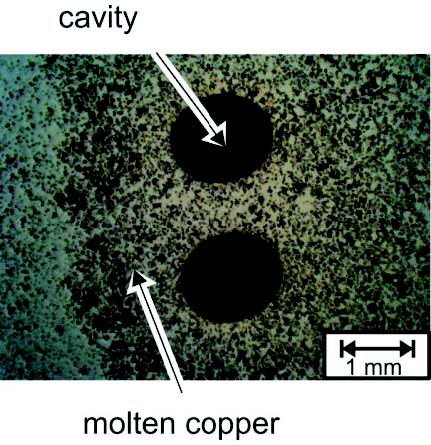
Production of the internal die temperature control takes places using the proven powder metallurgy processes (cold pressing, sintering, and compression). Cavities can be created in a cost efficient manner inside a steel powder matrix by introduction of a foreign element with low melting temperature (e.g. copper). This involves the application of capillary effect which ensures that during the sintering process the molten copper flows in the surrounding porous steel matrix (Figure 2).


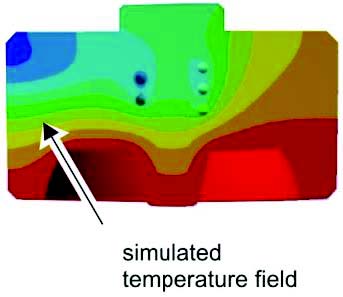


The position of the foreign element in the matrix powder during the production phase after pressing as well as sintering can be accurately predicted with the help of FEM, taking into account all boundary conditions. Furthermore, the channel design and location has an effect on the behavior of the forging die during application phase. Thus, prediction of temperature distributions during the application phase leads to an optimized design of the cooling channels (Figure 3).
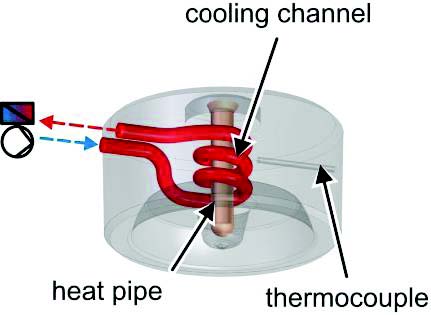
The temperature regulation of the die is carried out through a commercially available temperature control instrument (medium: oil) which allows heating of the die core from room temperature up to 250 °C (Figure 4). An automated control of die temperature is carried out by monitoring the inflow and the outflow of the medium or via an external temperature sensor.
Efficiency of the introduced cooling channels is analyzed by monitoring temperature distributions with a fiber optic measuring system. The system detects the resulting laser scanned Raleigh back scatter signals as a result of the local refractive index variations along the glass fiber sensor. Resulting temperature distribution of the tool can be precisely acquired through high resolution measurement of temperatures along the glass fiber (a measured value for every 1.25mm). Moreover, the measuring system possesses high temperature sensitivity (Temperature variations as low as 0.1°C can be measured). Furthermore, parallel measurement can be obtained from all the sensors up to a frequency of 24 Hz. These measurements will be used as an approach for design optimization.
Data storage and component labelling within bulk material by sintering
The counterfeiting of products causes a considerable financial loss for the industry. In case of inferior imitations of safety-related components, a health hazard exists as well. This results in demand for efficient ways to protect the components from plagiarism.
Furthermore, the industry demands innovative components that provide a growing range of functions. An important requirement is about the component monitoring.
Sintered components have the potential to meet these requirements on their own. The goal of this project is therefore the production of intelligent sintered components. These on one hand provide an opportunity to store information in their interior and on the other hand to capture the load status for monitoring the components.
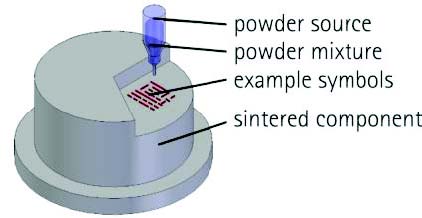


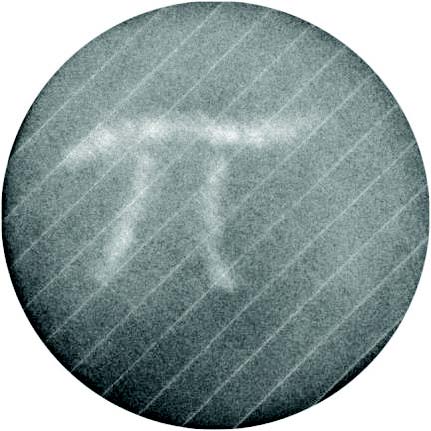
In the context of previous studies sintered components with a binary code in the component interior were successfully produced. Data storage was carried out by the introduction of foreign particles in the base powder (Figure 5). The use of foreign powder provides a great flexibility in data storage. For example letters, numbers, symbols or barcodes can be realized (Figure 6). Since the foreign powder is inside the device, the marking is not visible from the outside and can’t subsequently be manipulated. The reading of the data is carried out in a non-destructive and contact free manner e.g. with an X-ray machine. The foreign powder and surrounding powder reflect or absorb the X-rays differently, so that the information can be clearly reconstructed (Figure 7).




The monitoring of the component stress state is to be realized through the integration of appropriate external elements (magneto-elastic layers). These layers are applied to a thin carrier layer and pressed in the interior of the component with the powder. When an external load is applied, the layers are expanded inside, causing a measurable change in the magnetic field. The measurement of the magnetic field change under external stress during operation is achieved non-destructively by means of suitable eddy current sensors.
After implementation of the procedure, the process optimization and increase in the achievable capacity as well as the use of industrially relevant components are considered.
Subproject leader


30823 Garbsen


30823 Garbsen


