Measuring of process forces within highly rigid mechanical structures
Due to the high stiffness of machine tools, only minimal strains occur in the machine structures under machining forces. Hence the strain measurement under these conditions becomes difficult. A method to increase the signal amplitudes without increasing the signal noise is the local adjustment of the flux of force in the structures. Thereby, the adjusted flux of force leads to local increase in the mechanical strain. This can be achieved by manufacturing of small notches in the structures.
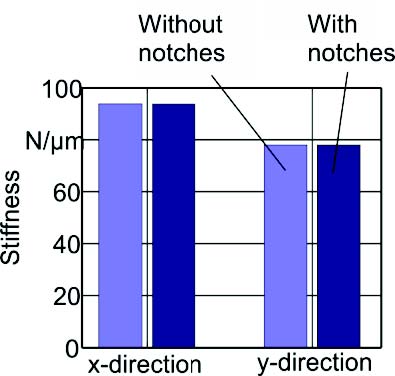
This approach is investigated on a spindle slide of a milling center. Several notches were applicated at selected locations in its structure and a sensitivity improvement is achieved. Because of the negligible dimensions of the notches compared to the spindle slide, the change of the slide stiffness due to the notches lies in a minimal range (Fig. 1). Their influence can be therefore ignored. In order to detect the mechanical strain, miniature strain sensors are integrated into the small notch grounds. In the spindle slide two different kinds of miniature strain gages, which were developed within the CRC 653, are applied: the first kind includes laser structured strain gages (L-SG) from the Laser Zentrum Hanover, which can be directly sputtered on any 3D-surface and subsequently structured using a laser beam. The second kind consists of micro strain gages from the Institute of Micro Production Technology, which are based on flexible polymer substrate and can be applied to flat surfaces (l-SG) (Fig. 2).


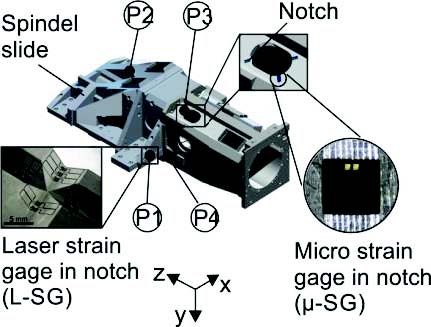


The sensitivity of the integrated strain gages are identified according to static forces at the TCP of the spindle slide in the directions x, y and z. In general, the strain gages in notch show clearly a big increase in the sensitivity to load compared to conventional strain gages which are located very closely to the positions of the notches but not integrated in notches.
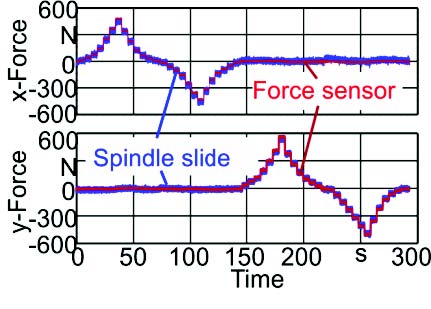
Based on the available sensor signals, the forces applied to the tool were reconstructed using methods of sensor data fusion and after calibration with an external force sensor (Fig. 3). At this stage, teachless or on-line process monitoring systems can be developed and provide additional potential benefits. As example, based on the force signals of the spindle slide, a measurement of the tool stiffness is executed in the machine by a soft collision of the tool with the work piece. With the known set distance and the measured variation of the collision force, the stiffness of the tool is calculated and used for further quality assessments.


Subproject leader


30823 Garbsen


